Browsing Category

Organization

Math Planning Binder

Math, Organization

I blogged about this last year, but wanted to update it for the new year and also explain a little more about how I used this.  Last year, I started using a math plan and reading plan binder. I’ll blog about the reading one tomorrow.  I found this binder so helpful when doing long range planning and then to use for the weekly lesson plans as well. 

Here’s what’s inside…

Cover

 
Tabs – Standards, Calendar, Plans, Book Ideas, School Mapping

 
First up, the standards. The basis for planning. I’ve updated this with  my new school’s standards since they don’t use Common Core.  All the standards are in here and easy to read in a cute font (all of us teachers love our fonts…don’t we?)

 
Next up, the calendar. Here’s a picture from last year. I mainly used this calendar to map out each quarter.  I liked having the monthly calendar in here because it made it easier to see the bigger picture.  After mapping a quarter out, then I could use this calendar to then focus in on the weekly plans which we had to do online at my old school.

 
Here’s my new calendar for this school year. Blank, but it’ll be full before I know it.  I purchased this calendar in A Modern Teacher’s Refill Calendar Pack. Check out her TPT Store, here.

After the calendar, I have the plans tab. In this tab, I have standards broken down into days. This is where I map out the actually lessons, ideas, books, videos, etc to use to teach a standard. I also pull from this to write my actual weekly lesson plans.

My book ideas tab is empty for now.  Need to find some great math book lists!

Last tab is my school’s math mapping. They set down last year and figured out what the different standards would look like in the different grade levels. Since they don’t use Common Core they had to narrow down the specifics for each grade. 


Thanks for checking out how I use my math planning binder.  Tomorrow I’ll explain how I use my reading one!
 
Follow me on…


Throwback Thursday – July 17

Back to School, Organization, TEAMS Binders
I’m joining in with Throwback Thursday this week especially since I’m out of town.  It’s also good to review and look back on some of the old blog posts….


This post is from May 2012 and is a great refresher for anyone looking to do take-home binders instead of take-home folders. I didn’t use them for the first time last year and missed them so I’ll be bringing them back.

******* May 2012

My first year teaching when I was in 3rd grade, I used the typical, plain old take-home folder that was made out of paper.  I quickly discovered these folders weren’t the best way for kids to take things home in.  Not only did it just have 2 pockets – one for stays at home and one for return to school (which limited organization skills), but it was made of paper and most folders didn’t last long at all. 

After my first year teaching, I moved to first grade and started doing some research of take-home options. While looking on one of my favorite sites – Proteacher –  I found the perfect idea for me.  I’m a little bit of a control freak and love to organize so when I found the idea of MOOSE binders it felt like I hit the jackpot!  MOOSE binders are pretty much a way for kids to learn how to organize while helping the teacher stay organized using a take-home binder instead of folder.  I’m a huge sports fan and Phoenix Suns fan so instead of calling my binder the MOOSE binder, my binder is the TEAMS binder.  TEAMS stands for Teaching Everyone About Managment Skills.  If you do a search online, there are tons of names that have already been discovered and you are guranteed to find a organizational binder name that fits your classroom theme.

In my TEAMS Binder, I have two inner pockets in the binder, a pencil pouch, two folders, and a plastic sheet protector.  In the front inner pocket, the kids keep their “Player Stat Sheet,” which is where they color in the color they were on the Clip Chart for that day.  The pencil pouch is used for lunch money or important notes.  The two folders have different sides that are organized for different purposes.  One folder side is for “Important Notes for School,” where important notes go (as I’m sure you could figure out :-)).  There is also a folder for homework, a folder for items that need to be returned to school, and a folder called “Super Duper Work to Keep.”  In the plastic sheet protector, I put our special’s schedule so that it is always accessible to the parents.  The back inner pocket of the binder holds a page that explains the different sections of the binder.

I absolutely love, love, love these binders! I have made these binders each year and couldn’t go back to the traditional old take-home folder.  It does take some explanation time at first with the kids, especially in first grade.  However, I find by this point in the year they have the organization aspect down and it really pays off. Parents also love it as it teaches their kids organizational skills at an early age and helps the parents keep track of things.  Gone are those days of a folder with random papers everywhere and important papers getting buried or lost.

Below you will find pictures of the binder pages and two attachments.  The first attachment is the letter I send home with parents at the beginning of the year explaining how the binder works. The second attachment is the page that goes in the back of the binder to explain what goes where. 

Hope you enjoy and happy organizing!

Click here for the parent letter.

Click here for the explanation page.

***********************************

 
Follow me on…


Aha Moment with Binders

Organization
Now, I realize I might be a little late to the party on this one, but if you don’t know this trick hopefully I can save you some time.  I’ve been working on putting binders together with all of my teaching materials. I’ve made cute covers, but wanted to also make cute binder spines. However, ever time I try to actually put them in the spine they get all crinkled, ripped, and messed up.  Anyone else ever have this problem?
 
Well, I’ve seen many teacher’s beautiful binders with beautiful binder spines so I knew there must be a trick.  After googling (not sure if that is an actual word), I figured it out.  Laminate the binder spine.  I have no idea how I never thought of that especially since I love to laminate.  I tried it and it went in easy peasy. 
 
So, like I said, you maybe already knew this, but if not, hopefully I’ve helped you out.
 
 
Follow me on…


Organizing Standards

Back to School, Organization
Since I’m moving to a private school this year, I’ll have new standards. They don’t use Common Core, but use ERBs and CPAAs, which after looking at are very similar to Common Core.
 
I’m one of these weird people (like most teachers) and need it to look cute. The boring Times New Roman font that it prints out in from online wasn’t doing it for me.  Now, in addition to wanting to cute it up a bit, I also wanted to learn the standards.  And, I’m someone who if I type it…it helps me learn it.  So, I set forward and typed up ALL the standards. 
 
A copy of the standards will go in my Reading and Math Binders that I use for planning, but I also printed a second copy. This copy I put in sheet protectors and then used a binder ring to clip together so that it can hang by my desk. This way the standards are always right at my fingertips.  See below…
 
 
 My cover – Love The 3AM Teacher’s Binder Covers..

 
One page of Math Standards (see…much cuter font than Times New Roman)

In sheet protectors and binder ring used to keep each set of standards together. Now, it can hang by my desk and be easy to grab and use.


Follow me on…


Monday Made It – July 7

Classroom Set-Up, Organization
I’m linking up with Fourth Grade Frolics for another Monday Made It. Be sure to link up here!
 
 
So, I’ve finally made the teacher toolbox.  And, let me tell you – it wasn’t as hard as I’d thought it would be.  Once I got the paper size figure out it went pretty quickly and was fun to make.  Here’s how I did it…
 
First, I purchased the toolbox from Lowe’s. It was $20.  They had two different versions. I decided to go with the one with larger drawers so I could fit more in them.
 
 
Then, I picked out my paper. I wanted to go with three colors since there were 3 drawers in each row. I wanted bright, but not too busy so I went with these three below.
 
Next, I cut the pages. It ended up roughly being 2.25 (a little less) by 4.25.  And, I say roughly. I ended up tweaking them after I cut them to the measurement above. It was a bit of trial and error, but at least I had a general guideline to start with.


Then, I made my labels. I used regular address size Avery labels and then trimmed them.  I decided to make two for – binder clips, index cards, sharpies, and large post-its (I have lots of all of these).  I then made one drawer for each of the following – staples, push pins, paper clips, small post-its, timers, hole punch, glue sticks, tape, and rubber bands.


Last, but not least I put it all together. I used double stick tape to stick the paper inside the drawer.  Now, this is the part that takes the longest.  Some of them fit well, but others once I set them in there were crooked and took a little adjusting. I did find that the double stick tape made it possible to move them a time or two, however it did ruin the paper of one or two of them so I ended up making a few new ones.


A few zoomed in shots…


Thanks for stopping by! Be sure to link up for Monday Made It!

Follow me on…


Monday Made It – June 30

Organization, Writing
Still no teacher toolbox yet lol.  Last week was wedding dress shopping and then my fiancé surprised with me a staycation at Mandalay Bay for the weekend…so needless to say the toolbox was the last thing on my mind.  I’m pulling for next week.
 
Even though I don’t have my teacher toolbox ready yet, I’m still linking up for Monday Made It with 4th Grade Frolics.  Be sure to link up here!
 
My new school that I’m at is big in the 5 step writing process. I know most schools use this, but my last one didn’t really have writing resources.  Since they’re big in it and I know we’ll have writing folders, I decided to turn my old teacher plan bins into storage for their writing folders. This way I can see where each student is at in the writing process and it can help me stay on top of that.  I got this idea from Pinterest here at the Superlative Six’s Blog. Thank you for the idea!


Follow me on…


It’s Finally Ready!!!! – Classroom Pictures

Back to School, Classroom Set-Up, Organization

I was so glad to see Swimming Into Second’s linky party to Show Off Your Space because as of yesterday at 5:15 pm – my classroom is finished and ready for kiddos on Monday.  Make sure you link up with her – I love getting ideas from everyone!
And in advance, sorry for all of the pictures…I got a little excited about finish and a little carried away with picture taking.

 
Classroom Library and Math Manipulatives Area
 

Small Group Table – still a work in progress
 

Board for Literacy Vocab and Bucketfilling beneath
 

Clip Chart and Bathroom Pass and Sign-out Area
 

Supplies for kiddos and the All Star Work Wall
 

Desks are all grouped into 4. So far 24 students so it works out perfectly!  The folders on the desks will eventually be their privacy folders for test-taking.  On the first day, while I’m taking care of first day things- attendance, supplies, etc – they’ll get to decorate their own privacy folder.


Sorry for the glare in these pictures. I’m keeping my basketball theme and these are the kiddos nametags for their desks.
 

Desk Supply Caddy – love how clean and organized it looks at the beginning.
 

Labeled supplies – helps keep everyone organized!
 

MVP (Student of the Week) Board and Core Learning Skills and Values board (part of Edison school)
 

Classroom Leaders Board – this is where I have class jobs. Kids can be the leader of clean, leader of lunch, etc.
 

Student Computer Area – this area needs some work and some replaced screens lol


Teacher Computer Area for Smart Board
 

Teacher Desk and Area (sorry it’s kinda blurry)
 

View from my desk
 

View from the class library
 

View from the front door
 

View from the back of the classroom
 

I Can’s are up and ready for the first day!
 
 
Thanks for checking out my pictures – sorry for the multitude of pictures, but had to celebrate finally getting it all done!  Hope everyone has a good weekend! 


Lesson Plan Binder

Back to School, Organization

If you’ve read a few of my blog entries, you know I love my binders for organization. Each year I get so excited to get a new lesson plan binder. It’s almost like when I was a kid and I was so excited to pick out my new backpack for back to school.  Well, binders are now my backpacks.  The Pinterest person in me can’t just have a plain binder, I have to make a cute cover.  See below..

At my new school, we have some extra programs that I need to keep info on and be organized about.  I decided on 8 tab dividers to help keep not only my plans organized, but also school info. Here are my tabs below:

  • Lesson Plans
  • School Info
  • Student Info
  • Behavior
  • Schedules
  • Common Core
  • Core Values
  • Core Learning Skills
 
Hope everyone has a good night!

Teacher Week – Friday/Saturday – Tips and Tricks

Organization

Well I’m a day late for the last day of the linky party, but better late then never. This week was crazy with set-up and meetings and trainings so I was exhausted yesterday and didn’t get a chance to post.  I’m linking up with Blog Hoppin’ for the final day of Teacher Week 2013.  For Friday’s Teacher Week, the topic is Tips and Tricks.  Now, many teachers always have a billion tricks up their sleeve, but I’m going to share one of my favorite back to school tips.  See below…

 
As I mentioned in a few of my blog posts this week, I love labels.  Love might be an understatement.  I actually probably have an unhealthy relationship with labeling lol.  Anyways, labels have been one of the things that help so much with back to school.  For students, I like to have a lit station folder, math station folder, take-home binder/folder, crayons, composition books, handwriting books, etc.  Well, you need to know whose is whose.  So, one thing I do before the kiddos even come with their supplies is make up the labels ahead of time. The reason I do this helps with the first day of school when the kids have all their supplies and are wondering what to do with them. I can hand them their crayon label and they can slap it on their crayons and they are good to go.  I also make a few extra pages of labels with just student names on them. You never know when you’ll need to stick names on something and it’s nice to have a pile of labels already ready to go.  Now, I know students move in or are added to the class at the last second, but the awesome thing is if you save the labels, you can just quickly add their name and print them one.


Than you for stopping by and a huge thank you to Blog Hoppin’ for hosting Teacher Week 2013. What a fun event this was to participate in!

Reading Plans Binder

Organization, Reading

I love using binders as a way to organize materials and plans.  Since Reading and Math have so many parts to it, I decided to make a Reading Plans and Math Plans binder to use this year, in addition to my lesson plan book.  I’m planning to use my lesson plan binder for school information and also to hold my weekly plans.  The Reading and Math Plans binder will have more specific information regarding the plans in those subject areas and will help me when filling out my weekly plans in my lesson plan binder. 

Here’s what I have in my Reading Plans Binder…

Cute Cover- I love using scrapbook paper and stickers to decorate binders.  Makes it look more fun!


Inside View with all of my tabs:


Standards Tab:
Here’s where the standards are going for ELA. Check out  my ELA Standards Freebie for 2nd grade over on TPT here.

 Calendar Tab:
In addition to my weekly lesson plans, I like to use an additional calendar to map out the reading standards for the whole year.  On this calendar, I place in each Harcourt story for the week and also the comprehension, language, and writing standards we are covering.  Mapping it out in advance helps me ensure that I teach all the standards by the end of the year.
I got this awesome calendar from Erica Marshall.

Plans Tab:
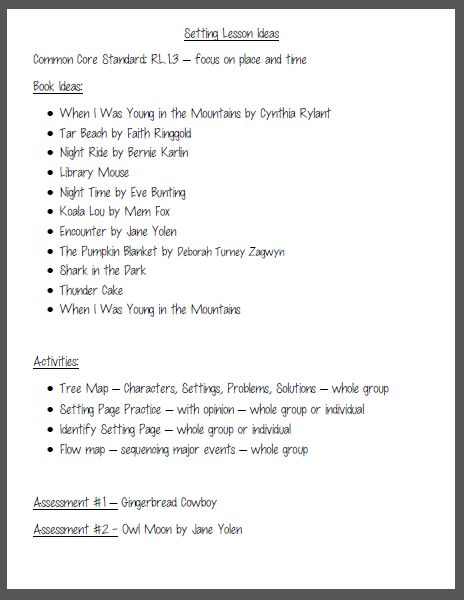
For each reading standard, I like to flesh out my plans adding in book list options, whole group options, independent practice options, etc.  See example below…

Book Lists Tab:
I have done a lot of research and found some great book lists on the internet.  It’s so nice when you’re looking to teach lessons on theme – you can look at the book list under theme – and there are numerous books you can use.  One of my favorite book lists is from Carmela Brown. 

Assessments:
I like having all of my assessments here, which makes for easy access for copying and planning.  Check out my setting assessment package on TPT. 

Thanks for checking out my Reading Plans Binder.  Tomorrow I’ll post my Math Plans Binder.  Have a great day!